A little fencing goes a long way, as I am finding out.
I have a problem with my current set of VM hosts. Every day around 6:30 AM, the active host goes bananas and pukes up a bunch of non-responsive CPU messages. Lovely. The worse part of this is not that it takes the VMs it's hosting with it, but that it nukes OCFS2. More to the point, I believe it hangs the DLM (distributed lock manager) that OCFS2 relies on. Without the DLM, no other node in the shared-storage cluster can access that shared-storage data, even if they themselves are perfectly sane.
What a pain!
There's a very good reason for it - if your insane node isn't just pumping out inane complaints that its CPU isn't happy, but instead crunching on your data, you really want it dead ASAP. Evidently, the DLM understands this and appreciates it more than the average human. It wholly expects STONITH to be properly configured and functional before it will let a dead node lie.
To test this, I followed these instructions on setting up libvirt-based STONITH on my virtualized test cluster. Awesome stuff. Had to make a few tweaks for my particular configuration. Now, first I had to validate that I could reproduce the issue I was experiencing on my real machines. I set up a DRBD-shared storage resource (dual-primary) and mounted it on both cluster nodes (who are called l2 and l3). I went to the mount-point on l2 and kicked off dbench for 500 seconds with 5 clients, to really work the system. After it chugged along for a minute, I switched over to l3 and nuked it. As predicted - and as experienced on the physical systems - the DLM hung itself. dbench reported ever-increasing latency (second-by-second, indicating no accesses were actually succeeding or failing).
Once the libvirt-based STONITH resources were configured, I ran the test again. I started dbench on l2, let it cook a few seconds, and then did a killall pacemakerd on l3 to simulate a major application crash. Of course, pacemaker would never crash...unless you're using CMAN on Ubuntu 12.04 and you put the friggin' node into standby. Yeah.
So the result of my manually killing pacemakerd was that the node was now insane. Happily, the STONITH kicked in and rebooted the node. Meanwhile the DLM went along its happy way.
Now, the story may not end there... after doing another test with "halt -f -n" I discovered my DLM still getting snagged. More research must now be done.
20120519
20120517
Software RAID Practices
I really like software RAID. It's cheap, easy, and extremely stable. It has lots of options, and I get the most awesome RAID levels I could ask for. I can migrate from a RAID-1 to a RAID-5, to a RAID-6...I can grow the array live, add or remove hot-spares, allow more than one array share a hot-spare. Compared with hardware solutions, it's amazingly complete.
What I love the most is that, unlike a hardware solution, any Linux system can mount it. There are a few catches to that, in terms of what it names your md devices, but if you are to the point of mounting your raid on another system, and your raid happens to be your root drive, you're probably advanced enough to know what you're doing here.
But what is a good practice to Software RAID? So many options make it difficult to know what the pros and cons are. Here I will try to summarize my experiences. The explorations here are via mdadm, the defacto standard software RAID configuration tool available on nearly every Linux distribution. Special non-RAID-related features I discuss are part of the Ubuntu distribution, and I know them to exist on 10.04 and beyond. Earlier versions may also support this greatness, though you may have to do more of the work on the command-line. This is also a "theory and practice" document, and so does not contain any major command line statements. If you want some of those, contact me.
Note that NO RAID is a guarantee of safety. Sometimes multiple drives fail, and even RAID-6 will not save you if three die at once, or if your system is consumed in a fire. The only true data safeguard is to backup to an offsite data-store. Backup, Backup, Backup!


 If you just want regular hard drives, easy rebuilds, and only one big happy array to deal with, a single partition RAID is probably your best bet. Each drive has a partition table and exactly one partition. This set of partitions is then added to a RAID device - levels 1, 5, and 6 are definitely supported by GRUB, others may be possible. The purpose here is to provide a place for GRUB to live on each of the drives in the array. In the event of a drive failure, BIOS should try the other drives in order until it finds one it can boot from. The Ubuntu grub package configuration (available via grub-setup
What I love the most is that, unlike a hardware solution, any Linux system can mount it. There are a few catches to that, in terms of what it names your md devices, but if you are to the point of mounting your raid on another system, and your raid happens to be your root drive, you're probably advanced enough to know what you're doing here.
But what is a good practice to Software RAID? So many options make it difficult to know what the pros and cons are. Here I will try to summarize my experiences. The explorations here are via mdadm, the defacto standard software RAID configuration tool available on nearly every Linux distribution. Special non-RAID-related features I discuss are part of the Ubuntu distribution, and I know them to exist on 10.04 and beyond. Earlier versions may also support this greatness, though you may have to do more of the work on the command-line. This is also a "theory and practice" document, and so does not contain any major command line statements. If you want some of those, contact me.
Note that NO RAID is a guarantee of safety. Sometimes multiple drives fail, and even RAID-6 will not save you if three die at once, or if your system is consumed in a fire. The only true data safeguard is to backup to an offsite data-store. Backup, Backup, Backup!
Method 1: Every Partition is a RAID
Each physical disk is partitioned. Each partition is added to its own RAID. So you wind up with multiple RAIDs (possibly at different levels).

Here we have four physical disks, the first two of which are large enough for four partitions. The other two join to augment the latter partitions. md0 and md1 would very likely be /boot and /swap, and configured as RAID-1. md2 could be the system root, as a RAID-5. Suppose we also need high-speed writes without data integrity? md3 could be a RAID-0. One of my live systems is actually configured similar to this. The reason: it captures a ton of statistics from other servers over the network. The data comes so fast that it can easily bottleneck at the RAID-1 while the system waits for the drives to flush the data. Since the data isn't mission-critical, the RAID-0 is more than capable of handling the load.
The benefits of this method is that you can do a lot with just a few drives, as evidenced above. You could even just have every partition be a RAID-1, if you didn't need the extra space of sdc and sdd. The detriment of it is that when a physical drive goes kaput, you need to recreate the exact same partition layout on the new drive. This isn't really a problem, just a nuisance. You also have to manually add each partition back into its target array. RAID-rebuilds are done one or two at a time, usually, but the smaller devices will go very quickly.
Method 2: Full Device RAID
Hardware controllers use almost the whole device; they reserve a bit for their proprietary metadata, even if you go JBOD (on some controllers, which stinks). Popping a replacement drive into the array means no partition creation - it just adds it in and goes. I thought, Why can't I do that? So I did.
You can do this via a fresh install, or by migrating your system over to it, but either way this is a little advanced. The concept here is to have a boot device separate from your main operating system RAID.

In this diagram, our /boot partition is kept separate. GRUB is able to handle this configuration without much issue. LILO could probably handle it, too, with an appropriate initrd image (i.e. you need to make sure your RAID drivers are loaded into the image to bootstrap the remainder of the system).
You can also turn /boot into a RAID-1, just to so that you don't run the risk of totally losing your way of booting your awesome array. I have done this with a pair of very small USB thumb-drives. They stick out of the computer only about a quarter of an inch, and the pair are partitioned and configured as RAID-1. /boot is on the md0 device, and md1 is my root drive. I tend to use LVM to manage the actual root RAID, so that I can easily carve it into a swap space and the root space, plus any additional logical drives I think are necessary.
There are some catches to using the thumb-drives as boot devices:
- Obviously, you need a mobo that supports booting from USB sticks.
- You MUST partition the sticks and RAID the partition. Trying to raid the whole USB stick will give GRUB no place to live. The GRUB installer on Ubuntu 10.04+ prefers to install to individual members of the RAID, and is smart enough to do so - put another way, it's not smart enough to realize that installing itself to a RAID-1 will practically guarantee its presence on both devices. This may be a safety measure.
- USB flash devices can sometimes raise hell with the BIOS regarding their number of cylinders and the size of them. Using fdisk alone can be tumultuous, resulting in a partition table that is followed too closely by the first partition. This results in GRUB complaining that there is no room to install itself on the desired device. To resolve this, you can try making a new partition table (DOS-compatibility is fine), or moving the first partition up one cylinder. The latter is almost guaranteed to work, and you won't lose enough space to even care. After all, what's 8M inside 8G? I doubt even NTFS is that efficient.
The plus to this is that replacing a failed root RAID device is as easy as adding a new device member back into the array - no partitioning required. Very simple. The downside is that sometimes the USB devices don't both join the RAID, so you have to watch for a degraded /boot array. Also, it could be considered a detriment to have to boot off USB sticks. It's worked fairly well for me, and is very, very fast, but there is another method that may be a reasonable compromise.
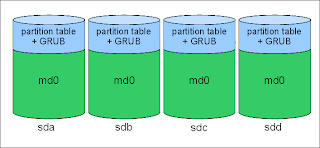
Method 3: Single Partition RAIDs
 If you just want regular hard drives, easy rebuilds, and only one big happy array to deal with, a single partition RAID is probably your best bet. Each drive has a partition table and exactly one partition. This set of partitions is then added to a RAID device - levels 1, 5, and 6 are definitely supported by GRUB, others may be possible. The purpose here is to provide a place for GRUB to live on each of the drives in the array. In the event of a drive failure, BIOS should try the other drives in order until it finds one it can boot from. The Ubuntu grub package configuration (available via grub-setup
Here again it is probably best practice - perhaps even downright necessary - to add your entire RAID device into LVM2 for management. Your root, swap, and other logical drives will be easy to define, and GRUB will recognize them. LVM2 provides such awesome flexibility anyway, I tend to feel you are better off using it than not.
The benefits here are fairly obvious: no gotchas with regard to USB sticks (because there are none), easy maintenance of the RAID, GRUB is automatically available on all drives (as long as you configure it that way), and LVM takes care of dividing up your available space however you please. Growth is but another drive away.
Extras: Growing Your RAID, and Migrating Your Data
Growing Your RAID
An array is a great thing. But sometimes you run out of room. So, you thought two 80-gig drives in RAID-1 would be sufficient for all your future endeavors, until you started gathering up the LiveCD for every Linux distro under the sun. First, you have a choice: another drive, or replacement drives.
If you have the ability to add more drives to your array, you can up the RAID level from 1 to 5. For a RAID-1 on two 80 gig drives, you instantly get double the storage and RAID-5 redundancy. If you want to replace your drives, you need to do it one at a time. During this time, your RAID will become degraded, so it may be a little bit dicey to go this route. You'll pull out one of the old drives, slide in a new drive (2TB, maybe?), and add it into your array. The rebuild will happen, and will hopefully complete without issue. The only instance I know of where it wouldn't complete is when your remaining live drive is actually bad.
Once you've replaced all the drives with bigger ones, you can resize your partitions (may require a reboot), order mdadm to enlarge the array to the maximum possible disk size, grow LVM (if applicable) and finally grow your file system. Don't forget to do grub-installs on each of the new devices, as well, especially if you're using Method 1 or Method 3 for your array configuration.
Alternatively, you can crank up a whole new array, get it totally sync'd, and migrate your data over to it. This is easy if you've got LVM running under the hood.
Migrating Your Data
Suppose you've configured your system as such:
Drives -> RAID (mdadm) -> LVM PV -> LVM VG -> LVM LVs (root, swap, boot, data, junk)
A brief explanation about LVM2: All physical volumes (PVs) are added to LVM before they can be used. In this case, our PV is our RAID device. All PVs are allocated to Volume Groups (VGs). After all, if you have multiple physical volumes, you might want to allocate them out differently. Typically I wind up with just one VG for everything, but it's no hard requirement. Once you have a VG, you can divide it up into several Logical Volumes (LVs). This is where the real beauty of LVM comes into play.
Suppose we've configured a second (huge) RAID array for our data. If our system was originally configured as detailed immediately above, we can order LVM to migrate our data from one PV to another. In other words, we would:
- Create our new RAID array.
- Add our new RAID to the LVM as a new PV.
- Ask LVM to move all data off our old RAID (old PV)
- This means it will use any and all available new PVs - in our case, we have only one new PV.
- Wait for the migration to complete.
- Order LVM to remove the old PV - we don't want to risk using it for future operations.
- Order LVM to grow its VG to the maximum size of the new PV.
- Resize our LVs accordingly (perhaps we want more space on root, data, and swap).
- Resize the affected file systems (can usually be done live).
- Make sure GRUB is installed on the new RAID's drives.
- Reboot when complete to make sure everything comes up fine.
The last step is not required, but is good practice to make sure your system won't be dead in six months, while you sit scratching your head trying to remember which of the above steps you left off at six months prior. I recently performed this exact sequence to migrate a live cluster system over to a new set of drives.
Hardware RAID Adapters and JBOD
If you've decided to pimp out your system with lots of drives, you'll have some fun trying to find SATA adapters that don't come with RAID. It's a challenge. I suppose most manufacturers think, Why wouldn't you want hardware RAID? Well, when I decide to purchase a competitor's card because your card is a piece of trash, I don't want to lose all my data in the process or have to buy a multi-terabyte array just to play the data shuffle game.
Most adapters at least offer JBOD. Many better adapters, however, seem to also want to mark each disk they touch. The result is a disk that is marginally smaller than the original, and tainted with some extra proprietary data. This comes across as a drive with fewer sectors, meaning that if mdadm puts its metadata at the end of the known device, and you move that device to a system with straight-up SATA, you may not see your metadata! (It's there, just earlier in the disk than mdadm is expecting, thanks to the hardware adapter from the original system.)
One benefit of partitioning a disk like this is that you can insulate mdadm from the adapter's insanity. The metadata will reside at the end of the partition instead of the end of the known drive. Migrating from one RAID controller to other, or to a standard SATA adapter, should be a little more safe, although I can't really speak much from experience concerning switching RAID adapters. In any case, another option is, of course, to have mdadm use a different version of metadata. Most of my arrays use version 1.2. There are a few choices, and according to the documentation they put the actual metadata at different locations on the drive. This may be a beneficial alternative, but is really probably a moot point if you RAID your partitions instead of the physical drive units.
Tidbits - Live Migration, Bonding, Bridging, DNS
Live Migration - NEVER TURN THEM OFF!!
I today succeeded in performing a live migration of a VM, from one host to another. From the source host:virsh migrate --live --verbose --domain myguest --desturi qemu+ssh://newhost/systemIt took all of about 8 seconds to complete the migration. No downtime. It is said this is done in such a way that connections are not even interrupted. I would like to test that for myself. :-)
Bonding, Bridging, and DNS
Ubuntu 12.04 now requires that DNS resolver directives reside in the /etc/network/interfaces file, or else are placed somewhere I haven't found out about yet. Here are the key directives, which should go with the adapter definition (as in, under iface eth0 inet static):
dns-search my.local.domain my.other.local.domain
dns-nameservers 192.168.4.4 192.168.4.5
For 10.04 up, bonding and bridging seem to be a lot easier. Unfortunately, the documentation for these features SUCKS (meaning it's almost non-existent, and forget the configuration examples, too). Here I configure a two-nic bond, using mode 6 (balance-alb - no switch support required). I also stuff the bond into a bridge (br0), since this host is also serving VMs:
auto eth0 eth1 br0 bond0
iface eth0 inet manual
bond-master bond0
iface eth1 inet manual
bond-master bond0
iface bond0 inet manual
bond-miimon 100
bond-slaves none
bond-mode 6
iface br0 inet static
bridge-ports bond0
address 10.17.0.124
netmask 255.240.0.0
gateway 10.16.0.1
bridge-stp on
bridge-fd 0
bridge-maxwait 0
Some things to note about the above:
- bond-slaves none was the recommendation of the forums and docs - the slaves are defined by specifying their master for each interface. This seems to work rather well.
- bond-mode now suggests it's even easier to set up different kinds of bonds on the same machine. Previously you had to do this by aliasing the bonding driver multiple times with different options. Not terrible, just a little more clunky.
- The bridge-* options used to be bridge_*. Note the dash is used instead of the underscore. Moreover, the forward-delay (fd) and maxwait are set to zero here. Trying to set them manually or via a method other than this seems to fail terribly - they'll always go back to their defaults! This is the first time I've been able to get my bridge to not have the 15 second forwarding delay on new interfaces, though I am anxious to actually validate it beyond any doubt. The configuration tells me that's the way it is, so hopefully it tells the truth.
I tied the VM to the bridge in the NIC configuration of the VM definition (libvirt-style):
Note: Remember that when creating new VMs, just omit the
and the tags, and they will be auto-filled with appropriate or auto-generated values.
20120513
Cascading Node Death
This might have something to do with the lack of actual STONITH devices in my configuration. Well, it's not a "live" cluster yet, though I find the lack of stability disturbing.
It started yesterday, and culminated with a drive into the office to reboot the downed machine. While I was there I rearranged some things, got everything back on gigabit (there was a 100 megabit switch in the mix), and added one PCI gigabit card that is only capable of about 660Mbit maximum aggregate throughput. I need to go shopping. Anyway, yesterday in the early afternoon, I was finally bringing some VMs online on v5. The node had taken to a single VM instance without issue, so I decided to try migrating two others. Then the first crack in the foundation appeared. The node, for whatever reason, went completely dead. The other two nodes, d1 and d2, appeared to stay up.
After the reboot and minor reconfiguration, I brought the three VMs up very slowly. Everything seemed to go OK. That was at about 1 am last night. This morning, I came to my workstation to find a report that v5 was again dead. I suspect a total kernel panic, but unfortunately without a screen attached I'll have to find out later. To perform at least some manner of "fencing," I popped a couple of rules into IPTables to basically drop any and all traffic from v5. This would theoretically be the same as pulling the power plug, unless there was communication below the IP layer.
Then I thought, "Hmm...maybe I can at least get things ready for some later tests." I had been using semi-production VMs to date, mainly internal R&D stuff that isn't of much consequence. After v5 died, I brought them back online on their original hosts. I had set up several "sandbox" VMs on another server, and since those are most definitely NOT going to be missed by anyone, I thought I'd load them onto my iSCSI-shared storage via d2. So around 15:00, I started an rsync to copy the VM images over. They were cruising at about 20MB/sec.
But they never made it.
I came back to my desk to discover that d2 had died. D1 was having a bit of trouble bringing the resources back online, so I suspected this was a case of The STONITH That Wasn't - I had been reading on some of the replies to other users of the Pacemaker mailing list that not having working STONITH can cause a hang-up (well, that's what I gathered, though it may not have been what they really said). D2 was inaccessible, and after doing some resource cleaning I managed to get D1 to bring all cluster resources back to life.
And then D1 died.
No explanation behind it, but when I get to the office tomorrow I'm gonna beat the thing with a hammer until it tells me what the issue is.
Whilst I type this, however, there is one thing that comes to mind. I now remember a little section of the OCFS2 installation guide, that mentions an imperative setting to basically force the kernel to reboot in the case of a particular kind of hang. Come to think of it, I had completely forgotten it until now, and will have to see if that helps. Naturally, that sort of thing does not seem very desirable on a virtualization host node. I may have to rethink which file system I want to use for the shared storage.
20120511
Pacemaker Best Practices
This really isn't a document about the best practices to use when defining Pacemaker resources. BUT, it IS a document containing things I'm learning along the way as I set up my HA clusters. This is basically: what works, what doesn't, and why (if I happen to know). I will try to update it as I learn.
 Suppose you want to offer up an HA iSCSI target to initiators (clients). Suppose your initiators and your target are both governed by Pacemaker - in fact, are in the same cluster. Here's a block diagram. I'm using DRBD to sync two "data-stores."
The current DRBD primary, ds-1, is operating the iSCSI target. For simplicity, ds-2 is acting as the only initiator here. What does this solution give us? If ds-1 dies for any reason, ideally we'd like the file system on ds-2 to not know anything about the service interruption. That is, of course, our HA goal. Now, we can easily clone both the initiator resource and the filesystem resource, and have a copy of those running on every acceptable node in the cluster, including ds-1. My goal is to have two storage nodes and several other "worker" nodes. This method totally masks the true location of the backing storage. The downside? Everything has to go through iSCSI, even for local access. No getting around that, it's the cost of this benefit.
The good news is that you can seamlessly migrate the backing storage from node to node (well, between the two here) without any interruption. I formatted my test case with ext4, mounted it on ds-1, and ran dbench for 60 seconds with 3 simulated clients while I migrated and unmigrated the target from machine to machine about 10 times. dbench was oblivious.
(Note that for a production system where multiple cluster members would actually mount the iSCSI-based store, you need a cluster-aware file system like GFS or OCFS2. I only used ext4 here for brevity and testing, and because I was manually mounting the store on exactly one system.)
Some keys to making this work:
iSCSI Target and Initiator Control
(Happily, I came to the realization that such a thing was probably not possible before I ever came to that article - now at least I feel like less of a dumb-ass.)

The current DRBD primary, ds-1, is operating the iSCSI target. For simplicity, ds-2 is acting as the only initiator here. What does this solution give us? If ds-1 dies for any reason, ideally we'd like the file system on ds-2 to not know anything about the service interruption. That is, of course, our HA goal. Now, we can easily clone both the initiator resource and the filesystem resource, and have a copy of those running on every acceptable node in the cluster, including ds-1. My goal is to have two storage nodes and several other "worker" nodes. This method totally masks the true location of the backing storage. The downside? Everything has to go through iSCSI, even for local access. No getting around that, it's the cost of this benefit.
The good news is that you can seamlessly migrate the backing storage from node to node (well, between the two here) without any interruption. I formatted my test case with ext4, mounted it on ds-1, and ran dbench for 60 seconds with 3 simulated clients while I migrated and unmigrated the target from machine to machine about 10 times. dbench was oblivious.
(Note that for a production system where multiple cluster members would actually mount the iSCSI-based store, you need a cluster-aware file system like GFS or OCFS2. I only used ext4 here for brevity and testing, and because I was manually mounting the store on exactly one system.)
Some keys to making this work:
- You obviously must colocate your iSCSITarget, iSCSILogicalDevice, and IPaddr resources together.
- the IPaddr resource should be started last. If you don't, the willful migration of the resource will shut down the iSCSITarget/LUN first, which properly severs the connection with the initiator. To trick the system into not knowing, we steal the communication pathway out from under the initiator, and give it back once the new resource is online. This may not work for everyone, but it worked for me.
- The iSCSITarget will need the portals parameter to be set to the virtual IP. Actually it's the iscsi resource that requires that, as it gets upset when it thinks it sees multihomed targets.
- Pick exactly one iSCSI target implementation - don't install both ietd and tgt, or evil will befall you.
- To ensure that the iscsi initiator resource isn't stopped during migration, you must use a score of 0 in the order statement. Here's the pertinent sections of my configuration:
-------------------
primitive p_drbd_store0 ocf:linbit:drbd \
params drbd_resource="store0" \
op monitor interval="15s" role="Master" timeout="20" \
op monitor interval="20s" role="Slave" timeout="20" \
op start interval="0" timeout="240" \
op stop interval="0" timeout="100"
primitive p_ipaddr-store0 ocf:heartbeat:IPaddr2 \
params ip="10.32.16.1" cidr_netmask="12" \
op monitor interval="30s"
primitive p_iscsiclient-store0 ocf:heartbeat:iscsi \
params portal="10.32.16.1:3260" target="iqn.2012-05.datastore:store0" \
op start interval="0" timeout="120" \
op stop interval="0" timeout="120" \
op monitor interval="120" timeout="30"
primitive p_iscsilun_store0 ocf:heartbeat:iSCSILogicalUnit \
params target_iqn="iqn.2012-05.com.ecsorl.core.datastore:store0" lun="0" path="/dev/drbd/by-res/store0"
primitive p_iscsitarget_store0 ocf:heartbeat:iSCSITarget \
params iqn="iqn.2012-05.datastore:store0" portals="10.32.16.1:3260"
group g_iscsisrv-store0 p_iscsitarget_store0 p_iscsilun_store0 p_ipaddr-store0 \
meta target-role="Started"
ms ms_drbd_store0 p_drbd_store0 \
meta master-max="1" notify="true" interleave="true" clone-max="2" target-role="Started"
clone cl_iscsiclient-store0 p_iscsiclient-store0 \
meta interleave="true" globally-unique="false" target-role="Started"
colocation colo_iscsisrv-store0 inf: g_iscsisrv-store0 ms_drbd_store0:Master
order o_iscsiclient-store0 0: g_iscsisrv-store0:start cl_iscsiclient-store0:start
order o_iscsisrv-store0 inf: ms_drbd_store0:promote g_iscsisrv-store0:start
-------------------
One final note... To achieve "load balancing," I set up a second DRBD resource between the two servers, and configured a second set of Pacemaker resources to manage it. In the above configuration snippet, I call the first one store0 - the second one is store1. I also configured preferential location statements to keep store0 on ds-1 and store-1 on ds-2. Yeah, I know, unfortunate names. The truth is the stores can go on either box, and either box can fail or be gracefully pulled down. The initiators should never know.
Why Fencing is REQUIRED...
I'll probably be dropping about $450 for this little gem, or something like it, very very soon. It's the APC AP7900 PDU, rack-mountable ethernet-controllable power distribution unit. Why? I'm glad you asked!
While testing the aforementioned iSCSI configuration, and pumping copious amounts of data through it, I decided to see how a simulated failure would affect the cluster. To "simulate", I killed Pacemaker on ds-2. Ideally, the cluster should have realized something was amiss, and migrated services. It did, in fact, realize something went bust, but migration failed - because I have no fencing. The DRBD resource, primary on ds-2, wouldn't demote because Pacemaker was not there to tell it to do so. We can do some things with DRBD to help this, but the fact is the iSCSITarget and IP were still assigned to ds-2, and there was no killing them off without STONITH. Without killing them, reassignment to the new server would have resulted in an IP conflict. Happy thoughts about what would've happened to our initiators next!
You now see the gremlins crawling forth from the server cage.
During the "failure," the dbench transfer continued like nothing changed, because, for all intents and purposes, nothing had. DRBD was still replicating, iSCSI was still working, and everything was as it should have been had the node not turned inside-out. Realize that even killing the corosync process would have no effect here. If ds-2 has actually been driven batshit crazy, it would have had plenty of time to corrupt our entire datastore before any human would have noticed. So much for HA! The only reasonable recourse would have been to reboot or power-off the node as soon as the total failure in communication/control was detected.
This was a simulated failure, at least, but one I could very readily see happening. Do yourself a favor: fence your nodes.
Oh yeah, and before you say anything, I'm doing this on desktop-class hardware, so IPMI isn't available here. My other server boxen have it, and I love it, and want very much to use it more. Still, some would advocate that it's a sub-standard fencing mechanism, and more drastic measures are warranted. I have no opinions there. FWIW, I'm ready to have a daemon listening on a port for a special command, so that a couple of echos can tell the kernel to kill itself.
Install All Your Resource Agents
I ran across an interesting problem. On two cluster members, I had iSCSITargets defines. On a third, I did not. Running as an asymmetric cluster (symmetric-cluster="false" in the cluster options), I expected that Pacemaker would not try starting an iSCSITarget resource on that third machine without explicit permission. Unfortunately, when it found it could not start a monitor for that resource on the third machine, the resource itself failed completely, and shut itself down on the other two machines.
Thanks to a handy reply from the mailing list, it is to be understood that Pacemaker will check to make sure a resource isn't running anywhere else on the cluster if it's meant to be run in only one place. (This could be logically extended.) Really, the case and point is: make sure you install all your resource agents on all your machines. This will keep your cluster sane.
Thanks to a handy reply from the mailing list, it is to be understood that Pacemaker will check to make sure a resource isn't running anywhere else on the cluster if it's meant to be run in only one place. (This could be logically extended.) Really, the case and point is: make sure you install all your resource agents on all your machines. This will keep your cluster sane.
Monitor, Monitor, Monitor
Not sure if this qualifies as a best-practice yet or not. While trying to determine the source of some DLM strangeness, I realized I had not defined any monitors for either the pacemaker:controld RA or the pacemaker:o2cb RA. I posited that, as a result, the DLM was, for whatever reason, not correctly loading on the target machine, and consequently the o2cb RA failed terribly; this left me unable to mount my OCFS2 file system on that particular machine.
Pacemaker documentation states that it does not, by default, keep an eye on your resources. You must tell it explicitly to monitor by defining the monitor operation. My current word of advice: do this for everything you can, setting reasonable values. I expect to do some tweaking therein, but having the monitor configured to recommended settings certainly seems less harmful than not having it at all.
iSCSI - Don't Mount Your Own Targets
This applies only if your targets happen to be block devices. Surely, if you use a file as a backing store for a target, life will be easier (albeit a little slower). The most recently meltdown occurred during a little node reconfiguration. Simply, I wanted to convert my one node to use a bridge instead of the straight bond, which would thereby allow it to host virtuals as well as provide storage. The standby was fine, the upgrade went great, but the restart was disastrous! Long story short, the logs and the mtab revealed that the two OCFS2 stores which were intended for iSCSI were already mounted! You can't share out something that is already hooked up, so the iSCSITarget resource agent failed - which also failed out the one initiator that was actively connected to it. The initiator machine is now in la-la land, and the VMs that were hosted on the affected store are nuked.
If you build your targets as files instead of block devices, this is a non-issue. The kernel will not sift through files looking for file system identifiers, and you will be safe from unscrupulous UUID mounts to the wrong place. Otherwise, don't mount your target on your server, unless you're doing it yourself and have prepared very carefully to ensure there is NO WAY you or the OS could possibly mount the wrong version of it.
If you build your targets as files instead of block devices, this is a non-issue. The kernel will not sift through files looking for file system identifiers, and you will be safe from unscrupulous UUID mounts to the wrong place. Otherwise, don't mount your target on your server, unless you're doing it yourself and have prepared very carefully to ensure there is NO WAY you or the OS could possibly mount the wrong version of it.
Adding a New Machine to the Cluster
Some handy bits of useful stuff for Ubuntu 11.10:
- apt-get install openais ocfs2-tools ocfs2-tools-pacemaker pacemaker corosync resource-agents iscsitarget open-iscsi iscsitarget-dkms drbd8-utils dlm-pcmk
- for X in {o2cb,drbd,pacemaker,corosync,ocfs2}; do update-rc.d ${X} disable; done
Idea: Have a secondary testing cluster, if feasible, with an identical cluster configuration (other than maybe running in a contained environment, on a different subnet). Make sure your new machine plays nice with the testing cluster before deployment. This way you can make sure you have all the necessary packages installed. The goal here is to avoid contaminating your live cluster with a new, not-yet-configured machine. Even if your back-end resources (such as the size of your DRBD stores) are different (much smaller), the point is to make sure the cluster configuration is good and stable. I am finding that this very powerful tool can be rather unforgiving when prodded appropriately. Luckily, some of my live iSCSI initiators were able to reconnect, as I caught a minor meltdown and averted disaster thanks to some recently-gained experience.
In the above commands, I install more things than I need on a given cluster machine, because Pacemaker doesn't seem to do its thing 100% right unless they are on every machine. (I am finding this out the hard way. And no, the Ubuntu resource-agents package alone does not seem to be enough.) So, things like iscsitarget and DRBD are both unwanted but required.
Test Before Deployment
In the above section on adding a new machine to a cluster, I mention an "idea" that isn't really mine, and is a matter of good practice. Actually, it's an absolutely necessary practice. Do yourself a favor and find some scrap machines you are not otherwise using. Get some reclaims from a local junk store if you have to. Configure them the same way as your production cluster (from Pacemaker's vantage point), and use them as a test cluster. It's important - here's why:
Today a fresh Ubuntu 11.10 install went on a new machine that I needed to add to my VM cluster. I thought I had installed all the necessary resources, but as I wasn't near a browser I didn't check my own blog for the list of commonly "required" packages. As a result, I installed pretty much everything except the dlm-pcmk and openais packages. After I brought Pacemaker up, I realized it wasn't working right, and then realized (with subdued horror) that, thanks to those missing packages, my production cluster was now annihilating itself. Only one machine remained alive: the one machine that successfully STONITHed every other machine. Thankfully, there were only two other machines. Not so thankfully was the fact that between them, about 12 virtual machines were simultaneously killed.
Your test cluster should mirror your production cluster in everything except whatever is the minimal amount of change necessary to segregate it from the production cluster; at least a different multicast address, and maybe a different auth-key. A separate, off-network switch would probably be advisable. Once you've vetted your new machine, remove it from the test cluster, delete the CIB and let the machine join the production cluster.
A word of warning - I haven't tried this whole method yet, but I plan to...very soon.
20120510
Cluster Building - the Fallback!
Well, after a very trying couple of days, I've settled on a configuration that I think should work. Some extensive testing still needs to be done. It's late, so this will be rather brief.
For starters, I dropped back to Ubuntu 11.10. It's a nice intermediate step between 11.04 (with its broken iscsitarget-dkms build) and 12.04 (with its endless amounts of CMAN frustration). Basically, on 12.04, with CMAN running, putting a node in standby was a sentence of death for that particular node. It seems to be related to the DLM, but I haven't done much testing beyond that to verify it's that alone. I couldn't find anything in the forums to help, and don't feel like registering for accounts just to report what may possibly be my own stupidity, so the fallback position was a good compromise.
Why not just go without CMAN in 12.04? I couldn't find the dlm-pmck package! It's gone...possibly integrated into something else, but for lack of time and/or patience, I did not find it. It might be there, well hidden.
I watched a great video today from the three guys behind the majority of this tech: High Availability Sprint: from the brink of disaster to the Zen of Pacemaker - YouTube Really cool stuff, watch a cluster get built before your eyes!
After further trial and error, today I finally managed build and mount a HA iSCSI file store! What's better? On my two-node cluster, I successfully tested transparent fail-over during catastrophic node failure, while writing to the store. Using wget, I pulled down an Ubuntu ISO (I know, I know...but they're easy to find) and then hammered the cluster a bit. Now eventually things got kinda hairy and funky - maybe some 11.10 goodness to be fixed in 12.04? But for the most part, things ran great. And I was pretty brutal with the ups-and-downs of the resources and nodes. Chances are, Corosync just had a rough time catching up.
I did notice something strange: Pacemaker seemed to think nodes were back online even though Corosync was the only thing running on the recovered node.
A few words of caution:
- if your resource isn't starting, and you have constraints (like colocations, orders, etc), try lowering their scores or removing them entirely.
- remember that you have to enable resource explicitly on an asymmetric cluster (symmetric-cluster="false" in the cluster options)
- groups are handy ways to lump things together for location statements (where applicable)
- Use the ( ) syntax in ordering to make semi-explicit order events
- When using iscsitarget stuff, pick an implementation: iscsitarget or tgt - do NOT install both!
Cluster Building - 12.04 part 2
This is an incomplete article, and has been SUPERCEDED BY http://burning-midnight.blogspot.com/2012/07/cluster-building-ubuntu-1204-revised.html
Managing CMAN
Attempting to follow the instructions from both wiki.ubuntu.com and clusterlabs.org led to some minor frustration. That's past now, thanks to watching the /var/log/syslog scroll by while I started and stopped the cman service repeatedly. The problem was that the nodes were simply not talking to each other. All the configuration looked OK, but in fact there was a deeper problem. The Ubuntu setup typically puts an entry like this in the hosts file:
127.0.1.1 l6.sandbox l6
cman, trying to be all intelligent, was attempting to use the hostname reverse-resolution result to determine what adapter it should work with. It chose the loopback everytime. Even after adding entries specific to the machines, the loopback adapter was chosen first. I believe I didn't encounter this problem previously because I tend to use FQDNs when I specify hosts in files such as /etc/hostname. I don't know if that's best-practice or worst-practice, but at the moment it does what I need it to do. After updating l6 and l7 appropriately, and modifying /etc/cluster/cluster.conf to match the FQDNs, I was able to achieve full connectivity.
Reconstructing the Cluster
With the new 12.04 systems now talking and playing together, reconfiguration of resources has been the big task. So as to not forget this stuff in the future, here's a few laundry lists:
DRBD Backing Store Preparation
- Create volumes for data
- Create volumes for metadata, if using external metadata (see meta-disk and flexible-meta-disk)
- Configure DRBD resource file(s)
- Make sure the hostnames are correct - they MUST match `uname -n`, just like every other part of this cluster.
- Make sure the target volumes are correctly specified
- Double check the file!!!
- Initialize the storage: drdbadm create-md
- Force the initial sync: drbdadm -- -o primary
- After syncing, shut down DRBD and disable it's startup links
- Add appropriate DRBD management statements to the cluster configuration
Example:
primitive p_drbd_ds00 ocf:linbit:drbd \
params drbd_resource="ds00" \
operations $id="drbd-operations" \
op start interval="0" timeout="240" \
op stop interval="0" timeout="240"
ms ms_drbd_ds00 p_drbd_ds00 \
meta resource-stickiness="100" notify="true" master-max="2" interleave="true" target-role="Started"
OCFS2 Mount Preparation - Cluster-version
- Create target mount-points (/srv/
for example) - Add appropriate DLM and O2CB statements to the cluster configuration
- Start the resources - you should now have DRBD resources and the DLM stuff active in the cluster. If you don't, try rebooting all the nodes.
- mkfs.ocfs2 for all resources that are to be utilized this way.
- NOTE: The ocfs2_controld.cman seems to go a little nuts on first boot if it doesn't have a friend. In trying to format ds00 on l6, mkfs.ocfs2 didn't seem to be able to see the cluster until l7 came online. top also showed the ocfs2_controld.cman taking up to 50% CPU! That also went away after l7 popped onto the scene. When building a cluster, take it slow.
Example:
primitive p_dlm ocf:pacemaker:controld \
params daemon="dlm_controld" \
op monitor interval="120s" \
op start interval="0" timeout="90s" \
op stop interval="0" timeout="100s"
primitive p_o2cb ocf:pacemaker:o2cb \
params stack="cman" \
op monitor interval="120s" \
op start interval="0" timeout="90" \
op stop interval="0" timeout="100"
group g_dlm-o2cb p_dlm p_o2cb
clone cl_dlm-o2cb g_dlm-o2cb \
meta globally-unique="false" interleave="true" target-role="Started"
File System Mount
- Add the appropriate statements to the cluster configuration.
- Double-check all mount sources and targets!
- Make sure that DRBD is actually running correctly, and that the resource is PRIMARY on the intended machine (or primary on both for dual-primaries).
Example:
primitive p_fs_ds00 ocf:heartbeat:Filesystem \
params device="/dev/drbd/by-res/ds00" directory="/opt/data/ds00" fstype="ocfs2" \
op monitor interval="120s" timeout="60s" \
op start interval="0" timeout="120s" \
op stop interval="0" timeout="120s"
clone cl_fs_ds00 p_fs_ds00 \
meta interleave="true" ordered="true" target-role="Started"
colocation colo_fs_ds00 inf: cl_fs_ds00 ms_drbd_ds00:Master cl_dlm-o2cb
order o_drbd-ds00 0: ms_drbd_ds00:promote cl_dlm-o2cb cl_fs_ds00
Notes:
- The above order statement specifies a "should" ordering. So far I've observed, at least with Pacemaker 1.0, that "must" orderings (inf:) tend to cause total start failure. I haven't tried with 1.1 yet.
- The colocation statement defines a "must" relationship.
- Cloning the p_fs_ds00 resource is only necessary for dual-primaries. In fact, I think most of the clones are unnecessary if you're not going to use those resources on any other system in the cluster.
System Startup Scripts
It's getting hard to know what to start and what not to start automatically. I'll try to keep track of it here. Note that at the moment I have l6 not auto-starting cman or pacemaker, just because I want to be able to strangle the machine before it starts hosing the cluster after a reboot. But I would think the ideal thing would be to have it auto-start when things are nice again. You can always fence by disconnecting the NIC! (Although, NIC-fencing would make remote management of the node REALLY HARD...)
- drbd: disabled
- iscsitarget: ENABLED - make sure to flip the flag in /etc/default/iscsitarget to 'true'!
- open-iscsi: ENABLEDa
- corosync: disabled
- cman: ENABLED
- pacemaker: ENABLED
- o2cb: disabled
- ocfs2: enabled - not sure what this script does, or if its even useful...
Resource Access Notes
- The iSCSILogicalUnit resource looks like it fails when trying to connect to a device that has already been mounted. I guess that's to say that it wants exclusive block-level access to the device. That being said, we'll probably need to follow Linbit's instructions for setting up a second iSCSI target if we really want Active/Active.
- Local access to an iSCSI mount will probably need to take place using an iSCSI initiator. At least this abstracts the location of the target, and will most likely allow seamless migration of virtuals from one host to another (assuming that's really gonna work with OCFS2 - this remains to be configured and tested).
Having a successful connection with the iSCSI target now, I must resolve the issue of mounting the file system. Since it's OCFS2, and the cluster definition is managed by the cluster, a joining-node must therefore also be part of the cluster. OR, the resource must be managed by a secondary cluster; in this case, the storage cluster would be a cluster unto itself, and only manage the storage. DLM and all that would be unnecessary, only the iSCSI and DRBD stuff would be required. The secondary cluster would only focus on virtual device management and OCFS2 access. Should a node want to do both, either it has to be a member of both clusters (not likely, because I do not want to go there), or we must integrate both clusters into one unified cluster.
Taking the latter action, my guess is going to be that the clusters must run similar or the same cluster stacks. To avoid unnecessary suffering, let's go with that. All my hosts will need to migrate over to Ubuntu Server 12.04.
Let the fun begin!
20120508
Cluster Building - Ubuntu 12.04
This is an incomplete article, and has been SUPERCEDED BY http://burning-midnight.blogspot.com/2012/07/cluster-building-ubuntu-1204-revised.html
After learning a considerable amount about the ins and outs of cluster configuration and upkeep, it's not unreasonable to move to CMAN. I still have yet to understand why CMAN is so beneficial when Pacemaker seems to figure things out all by itself, but then that's my inexperience talking.
What To Do When The Romance Is Gone...
Well, it seems Canonical has decided that bugs are fixed via full release upgrades. What does that mean for my clusters? 11.04 ain't gonna cut it. 11.10 will probably work, but 12.04 is now out also. And since 12.04 is their new LTS target (if they even MEAN IT), I'll probably end up migrating to that. Begrudgingly.
I ran into a nasty issue where iscsitarget-dkms, which is (from what I gather) required to get the ocf:heartbeat:iSCSITarget plugin to work, won't compile in 11.04. Suck it, DKMS. iSCSI was my golden scepter of greatness. Now it's a trash-heap.
So, I've got one spare 11.04 machine (l5 is its name) going through a do-release-upgrade procedure. We'll see how it fares. Aside from a few pointed questions, it seemed to do its job rather successfully. YMMV. It's a VM for me, so I don't care - I did it over SSH.
So, I've got one spare 11.04 machine (l5 is its name) going through a do-release-upgrade procedure. We'll see how it fares. Aside from a few pointed questions, it seemed to do its job rather successfully. YMMV. It's a VM for me, so I don't care - I did it over SSH.
On to 12.04...
At least there is already a draft document outlining the major steps. I'll write down as I go the things I do to bring my new l6 and l7 machines up to snuff. Our goals, as usual: Pacemaker, Corosync, CMAN (probably), DRBD, OCFS2, iSCSI. If things go well, we may also explore a full host migration, which would only be necessary for a MASSIVE upgrade or in the event of Total Meltdown. Or just because it sounds like fun.Install the essentials - make sure your package manager is up-to-date with the latest sources, or it will probably puke everywhere.
Both
apt-get install drbd8-utils iscsitarget ocfs2-tools pacemaker corosync libdlm3 openais ocfs2-tools-pacemaker iscsitarget-dkms lm-sensors ocfs2-tools-cman resource-agents fence-agents
Without CMAN...
I first started with creating some basic LVM volumes for all my resources. I'll pretend we're gonna virtualize off these hosts, even though they themselves are virtuals. Two devices will be needed:
- a datastore (ds00), to house vm images and their definitions
- an iscsi config share (is00)
Both
lvcreate -L+2G -n ds00 vg00; lvcreate -L+500M -n is00 vg00
After setting up the DRBD resources, I configured the corosync.conf file according to previous instructions. Got rid of startup links as follows:
for X in {drbd,o2cb,ocfs2}; do update-rc.d -f ${X} disable; done
Don't forget to modify /etc/default/corosync and set START=yes. As one of my two new 12.04 virtuals ate itself, I had to configure one first. I pretty much copy/pasted my config from the old cluster to this new one.
At this point, I'm snagged and tired. 12.04 insists on letting resolvconf stomp my resolv.conf file - thanks! Some of the dlm-pmck stuff is missing now, meaning I'll probably have to break here and configure CMAN. As I mentioned before, l7 got nuked due to a bad virtual drive definition. Reinstall is finally done, configuration will happen tomorrow.
Sigh.
20120507
Cluster Building - Round 2
Rebuilding the Cluster - a Learning Experience
I realized that perhaps a better way to gain experience with cluster building is to do it in my sandbox of virtual machines. These machines are, for the most part, completely isolated from the greater network; they're on their own subnet, share a restricted virtual switch, and must communicate through a virtual firewall. I've already used this sandbox to test DRBD+OCFS2+iSCSI. Now I will use it again to experience with the cluster - the bonus here being that if a machine locks up, I can reboot it remotely!I will record the steps for a fresh, clean install on Ubuntu Server 11.04, running the 'server' kernel (in deference to the 'virtual' kernel) for Pacemaker, Corosync, OCFS2, DRBD, and iSCSI. As I have mentioned in a previous post, this Ubuntu wiki page has been instrumental in this process.
The following sequence of commands are run as root. I prefer to sudo su - my way into that shell when doing large batches of root-work. Execute however you please. As for the validity or accuracy of this document, no warranties are implied or suggested. In other words, use at your own risk, and YMMV. If you can dig it, have fun!
I will be executing these steps on l2.sandbox and l3.sandbox. l4.sandbox will act as a test client.
COROSYNC and PACEMAKER
On l2 and l3...We'll use PCMK for now, but bear in mind that OCFS2 has CMAN packages available as well.
Both
apt-get install drbd8-utils iscsitarget ocfs2-tools pacemaker corosync libdlm3 openais dlm-pcmk ocfs2-tools-pacemaker
I have already disabled a slew of services:
Both
update-rc.d o2cb disableupdate-rc.d ocfs2 disableupdate-rc.d open-iscsi disableupdate-rc.d drbd disableupdate-rc.d iscsitarget disable
Now a recommended reboot.
Both
reboot
Sadly, it was at this point that the VMs seemed to go into hyper-death. I really don't know why that happens, but it happens on occasion. I had to hard-kill the processes and restart the two machines.
I generated the authkey for corosync on l2 and copied it to l3.
l2
corosync-keygen
scp /etc/corosync/authkey l3:/etc/corosync/
Also, switch on corosync, or the init script won't touch it.
Both
sed -i 's/=no/=yes/' /etc/default/corosync
Next was to modify corosync.conf to meet my network's requirements. I modified the network, and turned on secauth. Then it was time to crank it up!
/etc/init.d/corosync start && crm_mon
It took about 30-45 seconds before the monitor registered the two machines. Both came up as online.
DRBD
Both
Now it's time to configure a redundant resource with DRBD. There are several ways to achieve data-redundancy, I just tend to like DRBD. It certainly isn't the end-all-be-all, but it does the job and is pretty efficient. I like the block-device approach as well. For sake of brevity, I will leave out the configuration files, but highlight the important parts. Following the DRBD documentation, we'll set up a device for our data, and another for the iscsi configuration files - both of which are configured for dual-primary mode. Another side note: I tend to use LVM as the backing store management of my hard drive or RAID storage. This gives me enormous flexibility without costing too much in throughput. To be honest, more is lost to the software-RAID (if you're crazy like me and do RAID-6) than to LVM, so it really doesn't hurt in my opinion to keep your options open. The whole device chain would look like this:
Drives -> RAID (mdadm) -> LVM -> DRBD -> OCFS2
You can toss encryption in there also, but be prepared for an additional penalty.
My DRBD devices are called ds00 and iscsi-cfg, respectively, as are my LVM logical volumes. Here's what I used for LVM (my VG is called ds):
Both
lvcreate -L+100M -n iscsi-cfg ds
lvcreate -l+100%FREE -n ds00 ds
drbdadm create-md ds00
drbdadm create-md iscsi-cfg
A word of caution - the docs recommend, and it's a good idea that they do, that you keep "allow-two-primaries" turned off until the resources are configured and up-to-date. Once you start them, DRBD may freak out a little about their inconsistent initial state.
Both
# if you disabled drbd, then
/etc/init.d/drbd start
# otherwise
drbdadm up ds00
drbdadm up iscsi-cfg
Nuke one of the nodes to make things consistent
Either
drbdadm -- -o primary ds00
drbdadm -- -o primary iscsi-cfg
Waiting for the sync to complete is not necessary, but I wouldn't recommend rebooting until its done. Things might get hairy. You can watch the resource progress via cat /proc/drbd.
Cluster Configuration
Now we must do cluster configuration. Of importance is to make sure we disable STONITH, and request that Pacemaker ignore a no-quorum condition. I added these lines to the property statement in the configuration:
stonith-enabled="false" \
no-quorum-policy="ignore"
Then came a slew of cluster configuration:
Either, via crm
node l2.sandboxnode l3.sandboxprimitive p_dlm ocf:pacemaker:controld \op monitor interval="120s" \op start interval="0" timeout="90s" \op stop interval="0" timeout="100s"primitive p_drbd_ds00 ocf:linbit:drbd \params drbd_resource="ds00" \operations $id="drbd-operations" \op monitor interval="20" role="Master" timeout="20" \op monitor interval="30" role="Slave" timeout="20" \op start interval="0" timeout="240" \op stop interval="0" timeout="240"primitive p_drbd_iscsi-cfg ocf:linbit:drbd \params drbd_resource="iscsi-cfg" \op monitor interval="20" role="Master" timeout="20" \op monitor interval="30" role="Slave" timeout="20" \op start interval="0" timeout="240" \op stop interval="0" timeout="240"primitive p_o2cb ocf:pacemaker:o2cb \op monitor interval="120s" \op start interval="0" timeout="90" \op stop interval="0" timeout="100"ms ms_drbd_ds00 p_drbd_ds00 \meta resource-stickiness="100" notify="true" master-max="2" interleave="true"ms ms_drbd_iscsi-cfg p_drbd_iscsi-cfg \meta resource-stickiness="100" notify="true" master-max="2" interleave="true"clone cl_dlm p_dlm \meta globally-unique="false" interleave="true"clone cl_o2cb p_o2cb \meta globally-unique="false" interleave="true"colocation colo_dlm-drbd 0: cl_dlm ( ms_drbd_ds00:Master ms_drbd_iscsi-cfg:Master )colocation colo_o2cb-dlm inf: cl_o2cb cl_dlmorder o_dlm-o2cb 0: cl_dlm cl_o2cborder o_drbd-dlm 0: ( ms_drbd_ds00:promote ms_drbd_iscsi-cfg:promote ) cl_dlmproperty $id="cib-bootstrap-options" \dc-version="1.0.9-da7075976b5ff0bee71074385f8fd02f296ec8a3" \cluster-infrastructure="openais" \expected-quorum-votes="2" \stonith-enabled="false" \no-quorum-policy="ignore"
This configuration was built in a shadow-CIB. Once it was committed, it seemed to execute fine. I tested putting one node into standby, and then back online, and everything went away and came back up as expected. With the resources now fully available, I did the OCFS2 file system creation:
Either
mkfs.ocfs2 -N 32 /dev/drbd/by-res/ds00
mkfs.ocfs2 -N 32 /dev/drbd/by-res/iscsi-cfg
Unfortunately, I hit this error:
iscsi-cfg is configured to use cluster stack "o2cb", but "pcmk" is currently running
After verifying I disabled all OCFS2 start scripts (via update-rc.d -f o2cb remove) and hitting the error again, I forced (-F) my way past it, and then realized that it was trying to tell me it detected that device as belonging to another cluster already. It was the unfortunate choice of names that had utterly confused me. Had I taken the trouble to zero out the whole device with dd, that would not have happened. Let this be a lesson to you.
Remember how I told you to let the DRBD resources fully sync before rebooting? Well, I didn't, and got a nasty split-brain while trying to resolve the above mkfs issue (due to a desperate reboot of one of the machines). It was even on the iscsi-cfg device that I hadn't yet tried to initialize with a file system! For future reference (DRBD 8.3 and below):
On the node you want to kill the data of:
drbdadm secondary resourcedrbdadm -- --discard-my-data connect resource
With that all done, we can configure the file system access. I'm rather curious to see whether or not accessing the device in a "mixed-mode" fashion will yield great evil (that is, with the DRBD-local machines accessing the DRBD device directly, and the remote devices via iSCSI). Logically, it shouldn't...that's why we're using OCFS2, after all.
Of course, after attempting to configure the file systems, all hell broke loose and sudden l3 became completely unable to initialize its o2cb resource! Reboots did not cure the problem. I even removed the new file system resources, to no avail. Ultimately I came across a Gossomer thread that suggested (loosely) stopping both nodes, and investigating the OCFS2 file systems with debugfs.ocfs2, using the 'stats' command to get information. I discovered with this that the iscsi-cfg device was totally hosed. After nuking it with dd, and rebooting, things came back up normally.
Taking things slower now, I first created the file system resources, committed, them, and watched them appear on the nodes (one per node, as per Pacemaker's known tendencies). Migrating them worked, so now both nodes and the file systems seem happy.
Working carefully through the cloning, colocation, and ordering directives, I now have a set of operations that work. The final modifications:
Either, via crm configure edit
primitive p_fs_ds00 ocf:heartbeat:Filesystem \params device="/dev/drbd/by-res/ds00" directory="/opt/data/ds00" fstype="ocfs2" \op monitor interval="120s" timeout="60s" \op start interval="0" timeout="120s" \op stop interval="0" timeout="120s"primitive p_fs_iscsi-cfg ocf:heartbeat:Filesystem \params device="/dev/drbd/by-res/iscsi-cfg" directory="/opt/data/iscsi-cfg" fstype="ocfs2" \op monitor interval="120s" timeout="60s" \op start interval="0" timeout="120s" \op stop interval="0" timeout="120s"clone cl_fs_ds00 p_fs_ds00 \meta interleave="true" ordered="true"clone cl_fs_iscsi-cfg p_fs_iscsi-cfg \meta interleave="true" ordered="true"colocation colo_fs_ds00 inf: cl_fs_ds00 cl_o2cbcolocation colo_fs_iscsi-cfg inf: cl_fs_iscsi-cfg cl_o2cborder o_fs_ds00 0: cl_o2cb cl_fs_ds00order o_fs_iscsi-cfg 0: cl_o2cb cl_fs_iscsi-cfg
One thing I am learning about Pacemaker is that you better not try to outsmart it, even if it's to make your life easier. Modifying existing colocation or ordering statements will being the Uruk-hai to your doorstep! Pacemaker appears quite smart enough to put things in their proper place once it sifts through the basic directives. That may or may not explain the iscsi-cfg file system corruption (which could have, in fact, been due to bad mkfs.ocfs2 options on the little 100M volume). Anyway, it was beautiful to watch it all come together. At last.
For Next Time
The Clusterlabs documentation suggests that CMAN is a good and necessary things for Active/Active clusters. I plan on going Active/Active/Active/Active... so perhaps they're right. I need to investigate how easy it is to add nodes into a CMAN-managed cluster while it's live.
STONITH is required. I understand and appreciate that now. I must find out how to make STONITH work for my workstation-class servers.
Whether to manage the cluster with one management framework, or with multiple, is a big question. I have two hosts (at least) that will offer shared-storage. At least one of those servers may also provide virtualization. A number of other hosts will use the shared storage and do virtualization exclusively. Sharing the cluster means control can happen from anywhere, management is "easier" and we gain some redundancy if our storage hosts double as VM hosts (even if we ensure this is NOT their primary responsibility). On the other hand, splitting off the VM cluster management to a separate ring may be very beneficial from a configuration-management perspective. That does appear, however, to be the only visible benefit I can yet think of.
The Ubuntu How-to (well, test-case) document I've been following goes on to talk about load-balancing. I'd like to try implementing that for the two iSCSI target hosts. Anything we can do to keep the adapters from getting completely overloaded would be A Good Thing (tm).
20120504
DRBD + Pacemaker
I followed this instruction fairly closely to get the basic DRBD + Pacemaker configuration working. A few notes from the effort:
Following the DRBD OCFS2 guide, I notice one change I need - ocf:ocfs2:o2cb is actually ocf:pacemaker:o2cb. I took a gamble and configured the o2cb resource with the parameter stack="cman". Sadly, I endured mucho failure when I committed my changes. None of the new OCFS2 resources seemed to start, and complained loudly about something being "not installed." To this I answered with installing the dlm-pcmk package on both servers, and four of the errors went away (two per machine). I am now left with two monitor errors that still complain that something is "not installed."
Of course, it would have been AWESOME if I had just read further on the Ubuntu wiki page to see the full apt-get line for supporting OCFS2 - one or two more packages later, and that fixed the problem. Still, it was valuable to learn about CMAN, and I may migrate the cluster in that direction since it may help protect against internal split-brain.
I will now reformat the shared data store as OCFS2, modify the Filesystem resource, and prepare for cluster goodness. Tonight or tomorrow I might try to get the iSCSI target working under Pacemaker.
- clone-max must be 2, or else the other node won't come up.
- Having the wrong file system on the target drive really hoses things up.
During my escapades, I had forgotten that the DRBD device I wanted to use for this example had been formatted as OCFS2. Since that file system requires some special massaging to mount, I specified ext4 in the DRBD resource configuration. Unfortunately, when Pacemaker failed to mount the file system, it got stuck in a state I didn't know how to get out of. The easy solution was to restart Corosync on each node. The first node that restarted came up instantly with the mount (once it was properly configured).
I now feel I have a basic working knowledge of crm's command syntax, and the kinds of resources I am able to configure. I still lack in-depth knowledge about items like ms (master-slave) and its meta fields, and other finer details. I believe they're in the parts of the Pacemaker documentation I have not yet come to, though I have diligently read through a good portion of it before starting this adventure.
I've now reconfigured the resource to work in dual-primary mode. That was easy - just change the master-max to 2, leave clone-max at 2, and remove the other options (don't know if I needed them or not - will find out later). Next, OCFS2 Pacemaker support. First order of business was examining the ocf:pacemaker:controld info. I noticed this line:
It assumes that dlm_controld is in your default PATH.Habawha?! OK. I go to the prompt and type dlm_controld and find nothing. But Ubuntu is nice enough to point out I should install the cman package if I want this command. So I do so, and allow apt-get to install all the extra packages it believes it needs.
Following the DRBD OCFS2 guide, I notice one change I need - ocf:ocfs2:o2cb is actually ocf:pacemaker:o2cb. I took a gamble and configured the o2cb resource with the parameter stack="cman". Sadly, I endured mucho failure when I committed my changes. None of the new OCFS2 resources seemed to start, and complained loudly about something being "not installed." To this I answered with installing the dlm-pcmk package on both servers, and four of the errors went away (two per machine). I am now left with two monitor errors that still complain that something is "not installed."
Of course, it would have been AWESOME if I had just read further on the Ubuntu wiki page to see the full apt-get line for supporting OCFS2 - one or two more packages later, and that fixed the problem. Still, it was valuable to learn about CMAN, and I may migrate the cluster in that direction since it may help protect against internal split-brain.
I will now reformat the shared data store as OCFS2, modify the Filesystem resource, and prepare for cluster goodness. Tonight or tomorrow I might try to get the iSCSI target working under Pacemaker.
Subscribe to:
Posts (Atom)